Moving grain efficiently and safely is a critical part of any agricultural or grain handling operation. Whether you are managing a farm, grain elevator, feed mill, or processing facility, choosing the right grain conveyor equipment can significantly impact productivity, grain quality, and overall operating costs. With several conveyor types available, selecting the best system requires understanding your facility’s needs and the characteristics of the grain being handled.
At KC Supply Co., we help customers choose grain handling equipment that keeps operations running smoothly from harvest through storage and processing.
Why the Right Grain Conveyor Matters
Grain conveyors are designed to move large volumes of grain quickly and efficiently. However, not all conveyors perform the same way. Choosing the wrong system can lead to unnecessary grain damage, excessive maintenance, and inefficient material flow.
The right grain conveyor system helps operations:
-
Improve grain handling efficiency
-
Reduce grain breakage and loss
-
Increase equipment reliability
-
Lower maintenance and operating costs
Selecting equipment that fits your specific operation ensures that grain moves smoothly from one stage of handling to the next.
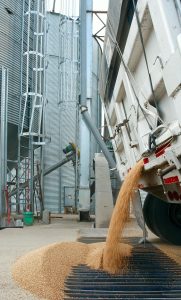
Common Types of Grain Conveyor Systems
There are several conveyor types used in grain handling. Each offers unique advantages depending on the application.
Auger Conveyors
Augers, also known as screw conveyors, are commonly used on farms due to their simplicity and affordability. They are effective for short distances and smaller operations. However, augers can sometimes cause more grain damage because the grain is pushed along by rotating flights.
Belt Conveyors
Belt conveyors move grain using a continuous belt system. They are known for their gentle handling and high capacity. A grain conveyor belt system is ideal for long-distance transport and for operations that want to minimize grain cracking or breakage.
Drag Conveyors
Drag conveyors use a chain and flight system to move grain through an enclosed trough. These conveyors are durable and are often used in grain elevators and commercial grain handling facilities. Their enclosed design also helps control dust and protect grain quality.
Key Factors to Consider When Selecting Grain Conveyor Equipment
Choosing the right grain conveyor involves more than picking a style of equipment. Several operational factors should be evaluated.
Capacity Requirements
Start by determining how much grain you need to move per hour. Conveyor capacity must match your harvesting speed, storage needs, and processing demands.
Distance and Layout
The distance grain must travel and the layout of your facility play a major role in equipment selection. Some conveyors perform better for horizontal movement, while others are better suited for incline or vertical transport.
Grain Type and Condition
Different grains behave differently during handling. Corn, wheat, soybeans, and other crops have varying densities and flow characteristics. Equipment should be matched to the grain type to avoid unnecessary wear or grain damage.
Maintenance and Durability
Grain handling systems operate in demanding environments with dust, moisture, and heavy use. Choose equipment built with durable materials that can withstand long-term operation with minimal maintenance.
Safety Considerations
Grain conveyor systems must also be designed with safety in mind. Proper guarding, emergency stop systems, and routine maintenance inspections help prevent accidents and equipment failures. Keeping conveyors properly aligned and maintained reduces the risk of breakdowns and improves worker safety.
Working with the Right Equipment Partner
Selecting the right grain conveyor equipment doesn’t have to be complicated when you work with experienced professionals. At KC Supply Co., we help agricultural and industrial operations evaluate their grain handling needs and choose the equipment that delivers reliable performance.
From augers and belt conveyors to drag systems and safety components, our team is ready to help design a solution that fits your facility and supports your long-term growth.
Final Thoughts
Grain handling equipment is a vital investment in the efficiency and success of your operation. By carefully selecting the right grain conveyor system, you can move grain more efficiently, reduce losses, and maintain the quality of your stored product.
If you’re planning upgrades or expanding your grain handling capabilities, KC Supply Co. is here to help you choose the equipment that keeps your operation moving forward.
 Grain storage is an essential part of agriculture, but it also carries serious risks. One of the most dangerous hazards workers face around grain bins and storage facilities is grain entrapment. When grain behaves like a liquid, it can quickly trap or bury a person, creating a life-threatening situation within seconds. Understanding the statistics, causes, and prevention strategies behind grain entrapment is critical for anyone working in or around grain storage systems.